(function(i,s,o,g,r,a,m){i['GoogleAnalyticsObject']=r;i[r]=i[r]||function(){ (i[r].q=i[r].q||[]).push(arguments)},i[r].l=1*new Date();a=s.createElement(o), m=s.getElementsByTagName(o)[0];a.async=1;a.data-privacy-src=g;m.parentNode.insertBefore(a,m) })(window,document,'script','//www.google-analytics.com/analytics.js','ga');ga('create', 'UA-68399380-1', 'auto'); ga('send', 'pageview');

Securing + speeding up WordPress through .htaccess

Most WordPress users are familiar with brute-force login attacks on their websites. Without proper defence through an appropriate security plugin, this can be a severe drain on your server – even without any person or bot managing to guess your password.

What some people may be less aware of, though, is that there is a much more efficient and reliable way to lock down your WordPress login page and admin area through your .htaccess file.

Requirements:

  • Access to your server via FTP and/or SSH in order to edit your .htaccess file
  • Willingness to update the .htaccess file every time you want to access your site from a new IP address

What is an .htaccess file?

Put simply, this is a small hidden file that can be placed in any directory and then tells the server how to behave. It is used by WordPress itself to generate appropriate page URLs according to your settings.

Why not just rely on security plugins?

Security plugins generally work based on an “innocent-until-proven-guilty” principle, i.e. blocking bad IPs as they break the rules defined by you or the plugin itself. This can cause a heavy load on the server. Why you might still want something like Wordfence to protect against content-ripping bots, spammers, and other malicious activity, there’s no reason to make its job harder than it needs to be. A small adjustment to the .htaccess file means Wordfence or whatever plugin you are using no longer has to monitor IP addresses trying to access your website, when 99.9% will not be legitimate (i.e. you) anyway.

Advantages of this approach

  • Much better security: only an IP you specify will even see that the page exists.
  • Much lower server drain than using a plug-in to monitor login failures.

Disadvantages of this approach:

  • You can no longer just log into your WordPress page “on the fly” from a new IP address: you have to edit the .htaccess file to add your new IP address.
  • …This can be a lot more work if you are assigned a dynamic IP address by your internet services provider. In my case, I am assigned a new IP every time I reset the router.

Notes:

  • It protects both your login page and the admin area – providing effective protection against a number of script-based attacks.
  • This .htaccess file goes in the root directory of your WordPress installation.
  • This can also be used with ipv6 addresses.
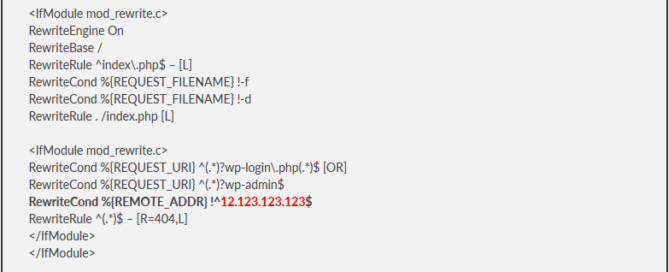
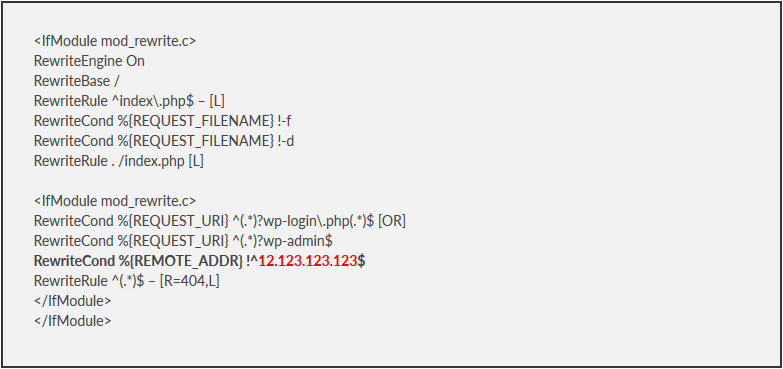
<IfModule mod_rewrite.c>
RewriteEngine On
RewriteBase /
RewriteRule ^index\.php$ – [L] RewriteCond %{REQUEST_FILENAME} !-f
RewriteCond %{REQUEST_FILENAME} !-d
RewriteRule . /index.php [L]

<IfModule mod_rewrite.c>
RewriteCond %{REQUEST_URI} ^(.*)?wp-login\.php(.*)$ [OR] RewriteCond %{REQUEST_URI} ^(.*)?wp-admin$
RewriteCond %{REMOTE_ADDR} !^12.123.123.123$
RewriteRule ^(.*)$ – [R=404,L] </IfModule>
</IfModule>

The first half there is just the part that WordPress needs to rewrite page names. I am including again here in case people accidentally overwrite it and go into a panic. The only part you actually need to include is:

RewriteCond %{REQUEST_URI} ^(.*)?wp-login\.php(.*)$ [OR]RewriteCond %{REQUEST_URI} ^(.*)?wp-admin$
RewriteCond %{REMOTE_ADDR} !^12.123.123.123$
RewriteRule ^(.*)$ – [R=404,L]

Be sure to:

  • always include this code snippit before the end of any other IfModules,
  • replace the number in red with your actual IP address,
  • and make sure the ^ at the start and the $ at the end remain intact.

What this actually does

This edit locks down your wp-login page and wp-admin area to only your IP. All others are given a simple, server-side 404-redirect, the same as what happens when someone tries to access a page that does not exist. You ensure that your IP address can always access these areas of your website by whitelisting it. This is done by including your IP address where I wrote 12.123.123.123 on the line that includes “REMOTE_ADDR”. If you want to approve multiple address, simply copy this line and include it again precisely below, and replace the IP with another IP you want to whitelist.

Testing

You can test you have set up everything correctly by trying to access these pages yourself (through the IP address you whitelisted) and then through a free web proxy (such as hide.me).

Securing + speeding up WordPress through .htaccess2019-09-18T13:26:40+01:00

CSF firewall to protect against DOS attacks

We all need to ensure our websites are accessible to legitimate visitors, don’t we? That’s why a DOS (denial of service) or DDOS (distributed denial of service) attack can cause such problems. For those who don’t know, this is when a server is maliciously overloaded with connection requests to render it inaccessible to legitimate visitors.

I recently had a problem with many DOS attacks on my server happening at once, going on for several hours. I don’t suspect that this was a true, large-scale DDOS attack (when multiple, different IPs coordinate the attack), since I still had some SSH-side connectivity and the number of very different IPs was still no more than a handful. That said, the number of new IPs coming in meant that it could no longer be dealt with manually. I needed something to automatically reject and ban suspicious IPs.

After speaking to an old developer friend who manages and hosts several websites on self-managed servers for his clients, it transpired that over all the years, he’d never actually had cause to look into this. This will be one of the other many ‘benefits’ of running a popular blog… My friend didn’t know of any quick solutions and had no time to help me out, either, so I decided to do some research and solve it for myself.

I did some research and came across CSF firewall: a Linux-based firewall that is not too much work to install on a VPS like mine. To install it, I largely followed the instructions at DigitalOcean – it says Ubuntu there, but it obviously works the same way for Debian Wheezy, for example. For the record, DigitalOcean is also the host my friend recommends for good self-managed VPS servers in the UK (I use a different host based in Germany for legal and data security reasons).

It was pretty easy to set up and there is a whole ‘host’ of options you can deploy to plug any holes in your existing security. For example, in a DOS attack, this firewall can be used to automatically ban any IP making more than X connections to a given port. You can also block any ports you know you don’t need to have open, for incoming and/or outgoing connections as required. There are lots of other useful settings, but that should give you an idea to start off with. If you search for “recommended CSF settings”, you’ll find a number of discussions and blog posts with different ideas for different circumstances.

A word of caution, though: CSF comes with a testing mode to minimise the risk of something going wrong, but it is possible to render your server inaccessible. The testing mode protects you in that it clears changes to the IP tables (blocked list) every five minutes, although you can extend this to a longer period if you are trying something especially innovative. I kept it on testing mode for a couple of hours to see what was happening and then made the change permanent.

I am very happy to say that I appear to have fixed the problem. See below for a screenshot of connections to port 80 (HTTP) both before and after the change on an otherwise quiet afternoon.

screenshot of a server during a DOS attack

My server before installing CSF firewall, during a DOS attack.

screenshot of a stable server with CSF successfully installed and configured

My server after installing CSF firewall, now properly protected against DOS attacks.

CSF firewall to protect against DOS attacks2019-09-18T13:26:42+01:00

Self-managed VPS + managed domain email + setup

DIY server management

For a commercial writer specialised in tech like me, nothing really beats doing a few things for myself. It’s a win-win situation: I get better results for less money, and I also have a genuine reason to stay abreast of the latest developments in internet security, web technologies, and internet marketing.

I use a self-managed dedicated Linux-based VPS server to host all my websites (this one, the German and English versions of my website for the German-speaking market, and my translation blog). This works well, most of the time: I have had the occasional hiccup in the past because the traffic (and thus the negative attention attracted by…) my translation blog is simply immense. This has been a really interesting and fun educational experience, though, and has given me a different understanding and experience of internet security, web hosting and command-line server interfaces compared to most would-be competitors out there.

A small remark regarding server locations: despite this being a .co.uk domain, reflecting my British identity and international clientele, I have been hosting my websites in Germany for quite a few years due to the advantages in terms of SEO, security, and client peace of mind. I’ll discuss this in more detail later on.

Shared hosting vs. managed and self-managed VPS hosting

If this concept of avoiding shared hosting is a little new, I really suggest reading a bit more about it on dedicated blogs. In short, shared hosting involves a few drawbacks: slower performance (due to having limited resources to go around), bad neighbours (due to your website perhaps having the same IP as a few less-reputable websites), security issues (a vulnerability in other websites on the server can lead to your website also being vulnerable), possible traffic and speed limits (meaning you may have problems if your website suddenly increases in popularity), and server instability (for all of the reasons above).

In SEO terms, shared hosting can result in penalties as a result of the slower performance (search engines measure how long it takes a site to load) and being in a ‘bad neighbourhood’ (if other sites on the server are known for spam, viruses, porn or instability, your site can also face a penalty). Long downtime will also cause an SEO problem, but most shared hosting is not problematic enough for this to occur.

Your best option for SEO, speed, and stability is therefore either self-managed or managed hosting. A managed VPS will start at approx. 30 EUR per month at the bottom end, and 100 EUR and up for better-quality service providers. A self-managed VPS can be a lot cheaper (I pay around 90 EUR per year at netcup GmbH), but you really have very limited support and must be capable of taking care of everything yourself. The most you’ll get in the way of support on a self-managed VPS is being able to call them to ask them to turn the server off and on again if you’re unable to do so from your end.

Own-domain email services

If you have your own websites, you’ll want matching email addresses, right? But once we step out of the relatively easy zone of managed and shared hosting, we quickly encounter things it it is simply unwise to take on yourself. In self-managed hosting, email management is not usually included.

The server load of a mail server can also be pretty intense, and you don’t want to have your mail server playing up any time you make changes to the server that’s hosting your websites, so it’s not like you even want to just slap it onto your existing server. Those things are hacker magnets and incredibly complicated to secure and keep secure. I simply don’t have the time to learn and then keep learning all the things I would need to know to maintain a safe and secure server. Any sensible person will then decide to go with a dedicated provider…

The problem here is that most companies that will provide email services for your own domain either want you to have bought the domain from them or are based in the US. Now why on Earth would that be a problem…?

Why security and server locations matter

Things can be secure enough from a consumer-focused, casual-user perspective across the globe. (Unless you’re an Ashley Madison user, I guess…)

The thing is, businesses are not casual users. And what freelancers and small business-owners are often prone to forget is… Nor are we.

Let me explain: the value of an email inbox is not merely defined by the importance of the person it belongs to; it’s also defined by the importance of the emails it contains, and, by extension, the importance of the people sending those emails.

Me? Rose Newell? I’m pretty small fry. Trouble is, many of my customers really aren’t…

What’s this got to do with hosting, mail servers, and security? Quite a lot. See, I was previously using an email service with servers located in the United States. As Snowden’s revelations have solemnly taught us, the American government is not above partaking in a bit of corporate espionage to further the interests of the United States and its largest corporations.

What does this mean for me and my clients? Well, the risk is small. Very small. But there is an infinitesimal risk that if you are based outside of the US and are using US-based servers for your email, you are putting your and your clients’ data at risk. US companies are not only outside the realms of EU and German jurisdiction – where we have some of the strictest legislation in the world – they are also inside the jurisdiction of the US government, and could be forced to reveal information upon request. And this does actually happen.

On top of this, German data protection law (Bundesdatenschutzgesetz) is some of the strictest in the world. Since I am resident here, I have to adhere to it. There are some clauses which make this a lot easier if your servers are located within the EU, preferably within Germany.

…And those are the reasons why I decided to go for a German email provider. In this case, domainFactory MyMail email hosting.

Solution and costs

Before I continue, I want to clarify that nobody is paying me to write this article and I am receiving no commission, discounts or free services in exchange for it. I’m just referring to domainFactory as they are who I went with and I’m impressed by the service and support. If you’re looking for something similar, based in Germany, I can recommend them.

I chose domainFactory because I was impressed by the value for money for my basic IMAP email account (MyMail) with 5 GB of online storage. I am paying just 0.55 EUR per month per mailbox, plus 3.48 EUR per year for each external domain I have linked to their service. After that, the number of email aliases I want to associate with each mailbox is absolutely unlimited, at no extra cost, and unrestricted in terms of having email addresses with different domains going to the same mailbox. The setup fee is just 2.95 EUR. Have a look at this screenshot to see a breakdown of the costs. Note that the mailbox itself is billed on a quarterly basis, but the external domains are billed annually.

dfeu

It should be noted that services like this one can also be used by anyone who would like a single, combined mailbox for multiple email addresses across different domains.

Setting up email aliases

To set up my different aliases on domainFactory, I first had to add each domain, free of charge, as an “external domain”. Once that was done, I was able to go to the email account details and add in each email alias – all free of charge as the emails are going to the same mailbox.

Thunderbird

Setting up email aliases is pretty easy on Thunderbird (my PC email software): on the account settings, you simply have to click “Manage identities” and can manage the defaults and behaviour from there.

iOS

It’s also pretty easy on my iPad: after adding the main account, I simply had to click on it for more details in the settings under “Mail, Contacts, Calendars”, then click on the account address, and then click on the account address again under “Email” in the next window, and then simply add another email (my aliases) and set a default.

Android

This becomes harder on Android. My solution was as follows:

  1. Set up the first account, your default account, as normal.
  2. Set up a second, but this time change the email address to the alias in the part that says email address, while keeping the user name part exactly as it was for the default account.
  3. Now change the sync settings from the default – set it to only sync the last day and only manually. This means it will only sync when you want it to (by accident!) and won’t trawl through back everything. You should also turn off alerts. You don’t need any of these things as you’ll be checking this account via the main email address. You just need this set up so you can send emails from this account.
  4. Now ignore any references to the combined inbox and avoid opening it, because if you do, it may well decide to synchronise that alias account, and you’ll see two copies of everything. If you use widgets, place one on your screen that shows the contents of your main email address inbox and not a combined inbox.
  5. If you did all of this correctly, you’ll now get an alert for any emails sent to either address, and these emails will all land in the same inbox. You will never get alerts for alias emails.
    HOWEVER: you will be able to change the reply field each time to change which address you are replying from. The default sender address will still be the default, but you CAN change the sender address in any email in just a couple of clicks, even on replies!

I’m so glad I finally got this sorted out. I hope these thoughts helped others in need!

Self-managed VPS + managed domain email + setup2019-09-18T13:26:42+01:00