Most WordPress users are familiar with brute-force login attacks on their websites. Without proper defence through an appropriate security plugin, this can be a severe drain on your server – even without any person or bot managing to guess your password.
What some people may be less aware of, though, is that there is a much more efficient and reliable way to lock down your WordPress login page and admin area through your .htaccess file.
Requirements:
- Access to your server via FTP and/or SSH in order to edit your .htaccess file
- Willingness to update the .htaccess file every time you want to access your site from a new IP address
What is an .htaccess file?
Put simply, this is a small hidden file that can be placed in any directory and then tells the server how to behave. It is used by WordPress itself to generate appropriate page URLs according to your settings.
Why not just rely on security plugins?
Security plugins generally work based on an “innocent-until-proven-guilty” principle, i.e. blocking bad IPs as they break the rules defined by you or the plugin itself. This can cause a heavy load on the server. Why you might still want something like Wordfence to protect against content-ripping bots, spammers, and other malicious activity, there’s no reason to make its job harder than it needs to be. A small adjustment to the .htaccess file means Wordfence or whatever plugin you are using no longer has to monitor IP addresses trying to access your website, when 99.9% will not be legitimate (i.e. you) anyway.
Advantages of this approach
- Much better security: only an IP you specify will even see that the page exists.
- Much lower server drain than using a plug-in to monitor login failures.
Disadvantages of this approach:
- You can no longer just log into your WordPress page “on the fly” from a new IP address: you have to edit the .htaccess file to add your new IP address.
- …This can be a lot more work if you are assigned a dynamic IP address by your internet services provider. In my case, I am assigned a new IP every time I reset the router.
Notes:
- It protects both your login page and the admin area – providing effective protection against a number of script-based attacks.
- This .htaccess file goes in the root directory of your WordPress installation.
- This can also be used with ipv6 addresses.
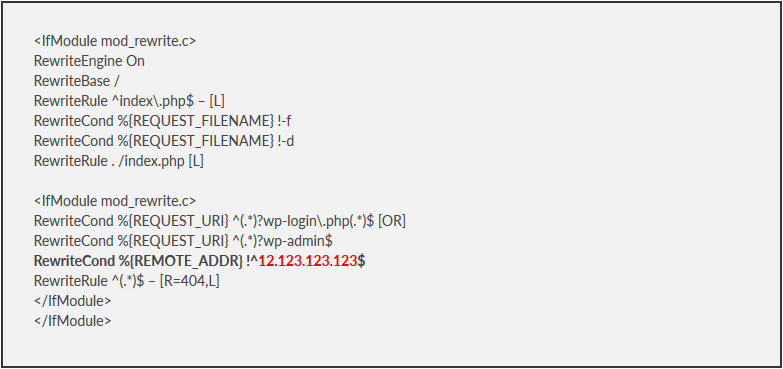
RewriteEngine On
RewriteBase /
RewriteRule ^index\.php$ – [L] RewriteCond %{REQUEST_FILENAME} !-f
RewriteCond %{REQUEST_FILENAME} !-d
RewriteRule . /index.php [L]
<IfModule mod_rewrite.c>
RewriteCond %{REQUEST_URI} ^(.*)?wp-login\.php(.*)$ [OR]
RewriteCond %{REQUEST_URI} ^(.*)?wp-admin$
RewriteCond %{REMOTE_ADDR} !^12.123.123.123$
RewriteRule ^(.*)$ – [R=404,L]
</IfModule>
</IfModule>
The first half there is just the part that WordPress needs to rewrite page names. I am including again here in case people accidentally overwrite it and go into a panic. The only part you actually need to include is:
RewriteCond %{REQUEST_URI} ^(.*)?wp-login\.php(.*)$ [OR]RewriteCond %{REQUEST_URI} ^(.*)?wp-admin$
RewriteCond %{REMOTE_ADDR} !^12.123.123.123$
RewriteRule ^(.*)$ – [R=404,L]
Be sure to:
- always include this code snippit before the end of any other IfModules,
- replace the number in red with your actual IP address,
- and make sure the ^ at the start and the $ at the end remain intact.
What this actually does
This edit locks down your wp-login page and wp-admin area to only your IP. All others are given a simple, server-side 404-redirect, the same as what happens when someone tries to access a page that does not exist. You ensure that your IP address can always access these areas of your website by whitelisting it. This is done by including your IP address where I wrote 12.123.123.123 on the line that includes “REMOTE_ADDR”. If you want to approve multiple address, simply copy this line and include it again precisely below, and replace the IP with another IP you want to whitelist.
Testing
You can test you have set up everything correctly by trying to access these pages yourself (through the IP address you whitelisted) and then through a free web proxy (such as hide.me).


Thanks for sharing, Rose. Can this also be used to stop Google from accessing parts of my website?
Sorry Steven, I just saw this.
If you want to hide certain parts of your website from Google, you’re better off using robots.txt. See here: https://support.google.com/webmasters/answer/6062608?hl=en
This would be more for limiting access to specific parts of the website. You can of course use the method above to make any individual file or folder accessible to only specific IP addresses.